1959 Wagon on 79 Wagoneer build

Broken Wagon

Well Oiled
Apr 25, 2015
1,109
California
First Name
Duane
Willys Model
  1. Wagon
Willys Year:
  1. 1960
This has been under way for a bit so I have some posting and pictures to get to.

It started with a 79 Wagoneer that was way behind on DMV fees. Guy from work let me take it away for the price of 4 cabinet doors and 2 drawer fronts custom built to finish his wife's bathroom.

The wagon cost me a Delta Unisaw tablesaw I had been storing for 15 or more years since closing my cabinet shop. It's rusty by California standards but looking at what some of you guys do with sheet metal, I will keep my mouth shut on that. It is clean DMV has its ID tags and both cool old black and gold California plates. She is clean non op in my name now.

The power train plan is very lightly warmed over 1962 Chevy 327, 1955 SM420, Advance Adapted to Dana/Spicer 18, Warn overdrive, Waggy Axles, springs, steering, brakes etc. I have all that piled up and some of it rebuilt already.

I took a bunch of measurements from a neighbors wagon and went for the frame cut long before I even had the wagon body. I cut for a 106 inch wheel base because I wanted a little more room in the front between the fenders and tires Not willing to test my wife's patience too awfully much I only had one body here at a time. The Wagoneer was long gone before the Willys came home.

I stripped the Wagoneer frame down leveled it all up, cut it, re-aligned it and leveled it and went to work tacking it back together. I removed all of the original body mounts and stuff I wasn't going to need.

I am using a 30 year old Lincoln buzz box and learning to weld as I go. (Do not expect to see many welds before I grind them down.) HAHA

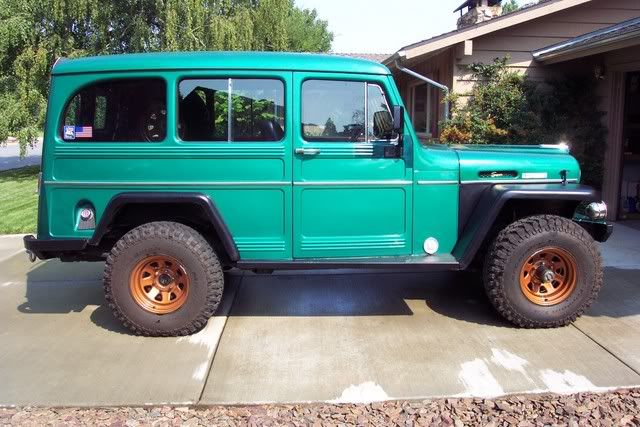
With any luck the pictures will work and do the explaining.

Duane

attachment.php
attachment.php
attachment.php
attachment.php
attachment.php
attachment.php
attachment.php
 

Attachments

  • 20140110_105458.jpg
    20140110_105458.jpg
    82.5 KB · Views: 1,647
  • 20140110_105514.jpg
    20140110_105514.jpg
    101.7 KB · Views: 1,644
  • 20140117_141017.jpg
    20140117_141017.jpg
    78.9 KB · Views: 1,635
  • 20140618_182701.jpg
    20140618_182701.jpg
    79.9 KB · Views: 1,629
  • 20140618_182745.jpg
    20140618_182745.jpg
    77.4 KB · Views: 1,632
  • IMG_0516.jpg
    IMG_0516.jpg
    65 KB · Views: 1,629
  • IMG_0526.jpg
    IMG_0526.jpg
    66.8 KB · Views: 1,630
Moving onward at a snail's pace

It's going slowly but I can feel its getting closer to the finish line. Oh maybe sometime in 2017?

Here is a little more progress.

I have been tinkering with the rust repairs. I borrowed a flux core welder and it has made life a great deal easier. I still use the Arc Welder for the chassis stuff because I still doubt the whole welding thing. I am a Cabinetmaker not a metal guy. (Yet)

The Willys body went up in the air. The Willys frame went away. The body is sitting on the donor frame with 1/2 inch plywood spacers. I played with a few different setups and decided to mount it as low as possible and will need a little spring lift in the back end. Using 3/16 steel plate I hoarded for years, pre-drilled steel squares left from a concrete job, I fabricated body mounts and began tacking them to the frame. I notched the rear cross member to clear the floor supports of the wagon.

Since I clipped about 3 inched off the back I am going to move the second from the rear cross member forward the same amount so I can use this cool aftermarket Aero Fuel Tanks baffled sturdy gas tank that came out of the Wagoneer. (Yeah 1980's trucks, solve the 9 mpg math by adding another 26 gallons of fuel tank.) The tank has a vent and return as well as the fuel pickup already in it in the event I take a walk down EFI road later.

The wagon had the 327 in it. Notice the all so common hole in the firewall to clear the Chevy rear Dizzy. I am going forward with the engine since I do not have to deal with that front cross member clearance issue with the Willys Chassis. The Wagoneer frame front cross member is way up front at the front spring perches.

I hope in the end the whole deal will look like it belonged there.


attachment.php
attachment.php
attachment.php
attachment.php
attachment.php
attachment.php
 

Attachments

  • dads iphone 060.jpg
    dads iphone 060.jpg
    62.7 KB · Views: 211
  • dads iphone 061.jpg
    dads iphone 061.jpg
    66.2 KB · Views: 1,523
  • dads iphone 062.jpg
    dads iphone 062.jpg
    76.1 KB · Views: 1,518
  • dads iphone 063.jpg
    dads iphone 063.jpg
    82.2 KB · Views: 1,529
  • dads iphone 064.jpg
    dads iphone 064.jpg
    61.8 KB · Views: 1,522
  • dads iphone 117.jpg
    dads iphone 117.jpg
    84.4 KB · Views: 1,511
  • dads iphone 130.jpg
    dads iphone 130.jpg
    68.4 KB · Views: 1,502
Be great to watch this all come together. Glad you mounted the body as low as possible so it looks like it belongs there as you said.
 
I was looking at the weld you did mating the old frame back together. There are two stress point in the frame, one at the top weld and one at the bottom weld. The top is usually under compression and the bottom is under extension (being stretched). Imagine what happens here when you hit a large bump with your front tire. The front suspension goes up quickly but the body stays put. The frame, being part of the suspension, flexes to take some of the jolt and the whole frame momentarily bends like a banana, with the font and back bending higher and the middle being lower. This greatly stretches the area exactly where you welded. Another small plate reinforcing the bottom of the weld would ensure that the weld holds.
 
Thanks for the suggestion I am going to be pulling the frame out again to complete the body mount welds. I think I will add as you suggested and possibly box the back half of the frame. It is factory boxed to about 18 inches beyond the transfer case crossmember.

Sent from my SM-G920V using Tapatalk
 
I got that stress relief suggestion from a friend of mine who's been building race cars for 40 years.
 
Good looking project, nice progress! What part of California are you located?

Dave
 
attachment.php
attachment.php
attachment.php
attachment.php
attachment.php
attachment.php
attachment.php


Here are some pictures of my rust challenges and basic body mounts tacked in place. Later the mounts get more plates and structure. It will be easier when I roll the frame back out from under the body.

You can see the previous owner added what they dubbed a hunting hole. It has been left open outdoors in San Pedro California near the ocean so the rust was just fed moisture for at least 15 years. I plan to patch it up after creating a support system inside with 1 inch square tubing. I plan to build a roof rack with slats on the roof so the gear sits right on the roof. My main reason for that is to keep things low enough to fit into parking structures at the local malls and airports.

I have been working at cutting out a section pretty much all the way around the top. I have been grinding the top metal on the rain gutter till its paper thin then taking a cold chisel to it. to reinstall new steel I have been drilling holes in the new and welding through to the drip rail. Then I go from the inside and tack to the drip rail more. I plan to use epoxy body joint sealer when I get closer to done.

That last picture is my patient shop dog that sits by hoping she gets to be a jeep dog before too long.
 

Attachments

  • 20140901_124334.jpg
    20140901_124334.jpg
    50.2 KB · Views: 1,382
  • 20140924_165734.jpg
    20140924_165734.jpg
    46.7 KB · Views: 1,378
  • 20150630_152547.jpg
    20150630_152547.jpg
    70.6 KB · Views: 1,382
  • 20150625_153917.jpg
    20150625_153917.jpg
    61.6 KB · Views: 1,375
  • dads iphone 054.jpg
    dads iphone 054.jpg
    58.1 KB · Views: 1,376
  • dads iphone 099.jpg
    dads iphone 099.jpg
    70.5 KB · Views: 1,362
  • dads iphone 094.jpg
    dads iphone 094.jpg
    61.8 KB · Views: 1,352
I started sheet metal with arc using 1/16 inch rod. Then a friend showed up and said I had to try his mig. I have gotten better with the mig. Had to slow down the wire feed and play with it a bit. The arc was being a stick welder at low amp settings, meaning it was sticking a lot. Surprisingly the arc welder was working fine until I got spoiled by the mig. I did floors etc in my first wagon in 1980 all using arc welder. Who knew there was soon going to be a better way. Thankfully the Wagons are built of forgiving 16 gauge.
 
Last edited:
I saw that build thread by willysworker. I confess I even downloaded a couple of his photos so I could zoom in on them and look closer. I modified the rear fenders on my first wagon in high school (1982) first with bondo to look like early ones then again when all the bondo fell off, using truck rear fenders. The result was very similar to this parkway conversion. This time around I was blessed with nearly rust free rear fenders.. I can't bring myself to cut them. I am using FSJ narrow track axles with stock wagoneer rims. They have abnormally large back spacing. I think 10.50 31 r15 tires are going barely tuck in under when they articulate. I will post pictures of where they sit now with 235's on them now.

My brother has owned two FSJ Wagoneers and loved them. He would probably still drive them if they were still built to tow his ski boats. They drive like Cadillacs compared to most straight axle trucks. I hope to end up with a highway cruiser that can handle some trail rides. My first wagon was a beast off road but no so nice as a DD. This time around I am going with heavy skid plates, rock sliders etc and less lift. Drag it over things instead of driving a tipsy top heavy tank on the road.
 
Last edited:
attachment.php
attachment.php
attachment.php
attachment.php
attachment.php
attachment.php


More pictures

The first one shows how the Wagoneer chassis is narrower in the back and the springs are hung next to the frame rail instead of under. It's also spring over instead of spring under in the back. The springs are wider and longer. The rear shackles go up instead of down. I think that screws up articulation but helps street ride. I forget what I read like a day after I read it. But I think that is what I read.

The next one shows the frame is hanging down from the body about 1 1/2 inches. It is also about an inch wider tubing or channel all the way along.

The next two pictures show the rear tires with stock Wagoneer rims with the frame in place. those are worn out 235 r15 tires on 7 inch wide rims. I think 10.50 31 r15 tires are going to end up there and possibly rub a bit at extreme bendies. I may flatten out the round over inside a bit. One side already is from over sized tires that were on it smacking and rubbing while the PO drove round with a couple dudes standing up shooting through the hole in the roof while loaded down with bears and ice and lots of ammo for a safe shooting trip.

The next pic shows that factory seam between the lower tub hump section and the floor. I am going to fold that seam up and seal it with Polyurethane. It will give me an extra inch or more when the tires go tweaking up and in.

The next picture is a partial display of my transmission collection. The left is a Chevy sm420 adapted to a spicer 18. The other is the T90 that came out of the truck. I am going to use the transfer that came out of the truck because its a 1.25 inch intermediate shaft case and the other is a 1.125. The overdrive unit goes back in too. I am trying to gear to cruise 60 without overdrive at a decent 2300ish rpm for towing. The overdrive will be the weak link and I don't want to tow my imaginary canned ham trailer with it. Then when not towing, popping into overdrive will see something like 2000 rpm at 70+.

The t90 and Advance Adapters bellhousing to Chevy are available if anyone is interested. I didn't drive it nor open it so I have no idea what kind of shape its in.

I also have a chevy sm465 and adapter to Dana 18/20 that will be up for grabs soon. I picked the SM420 because where reverse is and 1st gear is a tad lower (3.6 to 1) that will help me keep highway gears (3.54 or 3.73) in the diffs and not have to slip the clutch to get going. Not to mention the granny gear is like 7 to 1. These transmissions are not for the street racer. You have to rev the snot out of it in first then it takes 2 commercial breaks to get across the H into second. Anyone who has ever driven a t90 has been spoiled by the tight short throw. They shift better than many transmissions with canes half as long.

I remember the t98 in my first build was comfortable with 4.56 diffs but it had like 3.1 to 1 first. That is not low enough for 3.54 gears taking off all the time street driving. That is why there isn't one of them or a t18 in my pile of parts.
 

Attachments

  • 20150831_201106.jpg
    20150831_201106.jpg
    39.6 KB · Views: 812
  • 20150831_201114.jpg
    20150831_201114.jpg
    36.6 KB · Views: 811
  • 20150831_201130.jpg
    20150831_201130.jpg
    38.1 KB · Views: 807
  • 20150831_201135.jpg
    20150831_201135.jpg
    29 KB · Views: 818
  • 20150831_201207.jpg
    20150831_201207.jpg
    39.8 KB · Views: 818
  • 20150831_201517.jpg
    20150831_201517.jpg
    73.8 KB · Views: 810
Took my speedometer etc out of the dash tonight. Thx to Scramboleer's thread on gauges I think I can rebuild mine. Tore it apart. Time will tell. If I screw it up I may just have take a road trip up to the bay area and get him to put it back together.

I have four offset misaligned holes in the dash that someone plugged some Stewart Warners into. They are haggard.

May enlarge one of them holes for a tach and try to make it look like the dash was planned and not hacked.

Have 12 switch holes and two map light holes to weld up. Who knows what the toggle switches did. Maybe they turned on the disco ball etc. That's the fun of these old girls, who knows where they have been nor how many people sat in the driver's seat dreaming up big plans for them.

Sent from my SM-G920V using Tapatalk
 
Past due update. All the body mounts done except the grill. Its sitting on lumber for the moment. I have had the fenders and hood on and off 3 times while I figure out my best plan. I am going to use two mounts for the grill.

The engine is in. Used the Wagoneer engine mounts moved rearward about 4.5 inches. I then welded some tubes into 2x2 square stock to run my motor mount bolts through. I am using early 1960's Chevy mount pads. I have used them several times in the past with success.

See pictures.

The 327, SM420, large hole Dana 18 and warn overdrive are mocked up and in place. Used an empty transmission and transfer case to save some tonnage. The transmission crossmember is the factory Wagoneer one with a lil cutting and grinding.

That is currently held in place with a pair of jack stands

All the glass is out. I am about 75% bare steel. Still have lots of rust to man up and tackle.

95538294bf94ab3cb3e39fcb5eb728b0.jpg


8cdffb69b385602cdd37288040568550.jpg


1ffd99fbc00afe06f82107129d3c4dd8.jpg


ece20bbd1629eaeb306b1568215bb340.jpg


1c54fc0b20728d7710f323ce65aa656a.jpg


59 wagon frame swap in progress
 
Nice. I used Vermont Castings stove black on my rams horn manifolds. I just gave 'em a fresh coat after 20 years!
I wouldn't mind the 327 in place of my 283... You're gonna like that setup a lot. I recommend a hydraulic clutch unless you have a plan already. I used a chain roller set up--it works well enough but I think the hydraulic would be a cleaner install especially if you're using hanging pedals.
 
It has a set of hanging pedals in it. Some sort of 30 year old aftermarket deal. Firewall mounted and decent, but the pedals are short and a bit flimsy. I picked up a set of pedals from a Chevrolet pickup that I plan to use. Hydroboost master from an early Astro van and what I am guessing is an early 90's Chevrolet truck clutch master. It has a 1 inch bore so it will be easy enough to find a slave.

I used a Novak chain setup years ago in a cj3a. Worked nice. I am using a large diameter flywheel and 12 inch pressure plate, hydraulic clutch is a must so my wife can drive it too. Haha

As for the 327, it's a small journal. I got some script valve covers and plan to dress it plain Chevy orange. It has a vintage 1970's Edlebrock intake, quadrajet, torquer cam, pertronix points eliminate kit and big coil. Should move the light wagon just sweet.

59 wagon frame swap in progress
 
Steering box mounted. It involved finding the baggie labeled steering box bolts because the Wagoneer chassis had it already. It's a semi crossover steering setup. The drag link ties into the main tie rod. Supposedly Waggy's don't bump steer too bad without a lift.

Messing with column location. Then have to fabricate mounts. The bungee cords are hopefully temporary.

It should be pretty easy to lengthen the collapsible connector shaft between the column and steering gear. Cut, sleeve, weld, grind.

The column needs to be repaired at the bottom end with a bearing or bushing. I am going to remove the gear selector stuff and slip a section of 3" diameter black ABS drain pipe in place of that section. Then paint it all.

Labeled all the wires and tested them so I can use the turn signal and emergency flasher switches in the column. It is identical to a 1970's GM column with a few different wire colors.

column mock up rotated.jpgsteering gear rotated.jpguploadfromtaptalk1452742079469.jpg

59 wagon frame swap in progress
 

Attachments

  • uploadfromtaptalk1452742057086.jpg
    uploadfromtaptalk1452742057086.jpg
    43.5 KB · Views: 194
  • uploadfromtaptalk1452742097139.jpg
    uploadfromtaptalk1452742097139.jpg
    59.3 KB · Views: 195
Last edited:
Current wiring in the wagon. Someone liked connector strips.

Fuse box harvested from Wagoneer. 10 fuse slots and 2 breakers. The headlights will be on relays mounted under the hood as well as the electric cooling fan. I think I can work with this.


uploadfromtaptalk1452743040530.jpguploadfromtaptalk1452743057717.jpg

59 wagon frame swap in progress
 
Back
Top